Setting up SCIM Integration
This guide walks you through configuring SCIM (System for Cross-domain Identity Management) integration between your identity provider and Cosafe.
This article covers SCIM integration with the Entra ID (Azure AD) as the identity provider. To configure Cosafe SCIM with other identity providers, please contact support.
Prerequisites
Before starting the SCIM setup, ensure you have:
- Administrative access to your identity provider
- Administrative access to your Cosafe account
- API credentials provided by Cosafe support
Step 1: Contact Cosafe Support
- Request SCIM activation: Email support@cosafe.com to request SCIM integration activation
- Receive Connection data: Cosafe support will provide you with the SCIM URL
Step 2: Create API key for SCIM integration
- Access your Cosafe Admin Panel
- Navigate to Account -> Integrations tab
- Create SCIM API key
- Copy the key
Make sure to copy the API Key as you will not be able to see it again.

Step 3: Setup groups in Cosafe
Before enabling SCIM synchronization, set up groups in Cosafe:
- Access your Cosafe Admin Panel
- Navigate to Groups management
- Create groups where SCIM users will be assigned. Place those groups in the appropriate subaccounts. If a group already existed, you can use an existing group for the association.
- Entra only — Configure External ID: For each group in Cosafe Admin Panel, set the Group ID field to match the group ID from your identity provider (objectId in Entra).
Step 4: Identity Provider Configuration
Configure your identity provider to use the Cosafe SCIM Base URL. The exact steps vary by provider:
For Entra ID:
- Navigate to Enterprise Applications in Entra ID
- Create a new one or select your existing Cosafe application. For new applications:
- 2.1. "New application" -> "Create your own application" (top left)
- 2.2. "Name of your app" — any name, for example
Cosafe SCIM. It is preferable that you can later distinguish it. - 2.3. Select "Non-gallery"
- Navigate to "Provisioning" (left side), "Create new configuration" (top)
- Enter the SCIM Base URL from Step 1 and API key from Step 2
Note: You do not need to add the "Bearer " part to the API key; paste it directly into the input as provided.
- Press "Test Connection"
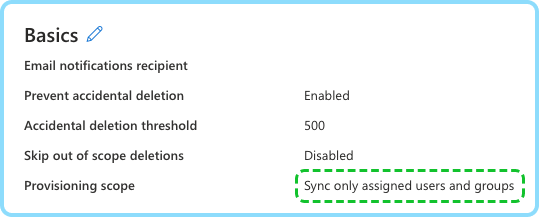
- Ensure the provision scope is "Sync only assigned users and groups" (Should be set by default)

Step 5: Attribute Mapping Setup
Entra
Group attribute mapping:
| Cosafe SCIM Attribute | Identity Provider Attribute | Required | Matching precedence | Description |
|---|---|---|---|---|
externalId | objectId | Yes | 1 | The id which was used to create groups in Cosafe |
displayName | displayName | No | The group name | |
members | members | Yes | User group memberships |
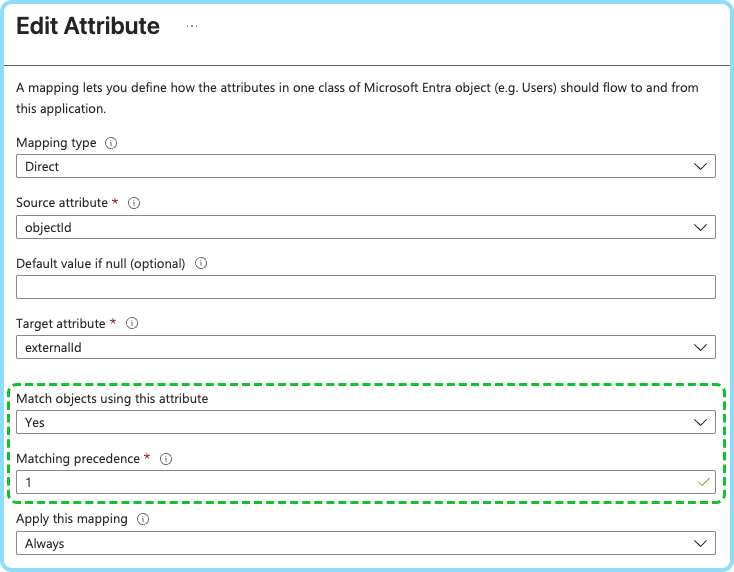
externalId must be a matching attribute. By default, the matching attribute is set to displayName with matching precedence 1.
To make Entra allow you to replace displayName as a matching attribute with externalId:
- Change
displayNamethe precedence to 2 - Edit the
externalIdattribute via "edit" button (see screenshot), set"Match objects using this attribute": "Yes","Matching precedence": 1 - Go back to
displayNameand set"Match objects using this attribute": "No", to remove the matching precedence from this attribute. Save
- If you want to delete
displayNamefollow the steps in the video below, under "Optional: Remove DisplayName".


Optional: Remove DisplayName
User attribute mapping:
| Cosafe SCIM Attribute | Identity Provider Attribute | Required | Matching precedence | Description |
|---|---|---|---|---|
userName | userPrincipalName | Yes | 1 | Unique user name. Must be email |
active | Switch([IsSoftDeleted], , "False", "True", "True", "False") | Yes | Indicates if the user is enabled | |
displayName | displayName or name | Yes | User's full name | |
title | jobTitle | No | User's job title | |
phoneNumbers[type eq "work"].value | Switch(IsNullOrEmpty([telephoneNumber]), "tel:", "True", "tel:", "False", [telephoneNumber]) | No | Primary phone number | |
phoneNumbers[type eq "mobile"].value | Switch(IsNullOrEmpty([mobile]), "tel:", "True", "tel:", "False", [mobile]) | No | Secondary phone number |
- Username must be an email address
- Username (Email address) must be unique across the Cosafe platform
- Username (Email address) should match the email you wish your synced users will have in cosafe. If it doesn't match the
userPrincipalNameyou have in entra, you can map it toemailEntra property - You must delete
emails[type eq "work"].valuerow - Phone numbers must be in international format (e.g., +46701234567)
- Setting
activeto false will trigger user deprovision. More details on user deprovision: User Deprovision

Additional information for setting up attribute mapping in Entra: Entra Customize Application Attributes
Step 6: Assign groups to the integration
Entra
Navigate "Provisioning" -> "Users and groups"
- Press "Add user/group"
- Select the groups you want to assign. Note: can select several at the same time
- Press "Assign"
If the user is a member of the group in AD, which is assigned to the scim integration, — that user will also be considered as assigned to the scim integration.
Step 7: Start provisioning
You can now start provisioning!
Supported SCIM Operations
Cosafe implements a subset of the SCIM 2.0 standard, supporting the following operations:
User Operations
- ✅ List Users (
GET /Users) - ✅ Find User (
GET /Users?filter=userName eq "user@example.com") - ✅ Read User (
GET /Users/{id}) - ✅ Create User (
POST /Users) - ✅ Update User (
PUT /Users/{id}) - ✅ Patch User (
PATCH /Users/{id}) - ✅ Delete User (
DELETE /Users/{id}, more details on user deprovision: User Deprovision)
Group Operations
- ✅ List Groups (
GET /Groups) - ✅ Find Group (
GET /Groups?filter=externalId eq "xxxxxxxx-xxxx-Mxxx-Nxxx-xxxxxxxxxxxx") - ✅ Read Group (
GET /Groups/{id}) - ❌ Create (groups are created within Cosafe)
- ✅ Update Group (
PUT /Groups/{id}) - ✅ Patch Group (
PATCH /Groups/{id}) - ✅ Delete Group (
DELETE /Groups/{id})
Supported Attributes
Users:
userName(required, updatable)displayName(required, updatable)phoneNumbers(optional, updatable)title(optional, updatable)id(assigned by Cosafe, not-updatable)externalId(optional, updatable)emails(assigned by Cosafe, will always equaluserName)active(required)
Groups:
id(assigned by Cosafe, not-updatable)externalId(required, updatable)displayName(required, updatable)members(required, updatable)
User Deprovision Flow
User is being deprovisioned when Cosafe SCIM will receive:
DELETE /Users/{id}PUT /Users/{id}withactive: falsePATCH /Users/{id}withactive: false
All of those 3 variants will trigger user deprovision, and the user will be deleted. The user sessions will became invalid, they will no longer have access to Cosafe mobile nor Web application. Later the user can be automatically re-created.
When is deprovisioning triggered?
- When user is soft-deleted from your directory, identity provider will send SCIM request via PATCH or PUT to set the user as
active: false - When user is hard-deleted from your directory, identity provider will send SCIM request via DELETE. But in order to hard-delete a user, usually identity providers require to soft-delete a user first; which triggers the first case.
- When a user no longer has a direct or indirect SCIM integration assignment (through membership in an assigned group; see Assign groups), the user will be deleted.
If the provider is Entra, you can move the user between groups within the synchronization interval without triggering deprovisioning.
Troubleshooting
Common Issues
Users not syncing:
- Verify API key is correct and active
- Verify SCIM Base URL format is as provided in Step 1: Contact Cosafe Support
- Verify that needed users are members of assigned groups in your identity provider
- Confirm user mapping configuration
- Review provisioning logs in your identity provider
Group assignments not working:
- Verify group IDs exist in Cosafe
- Verify groups are assigned to the integration in your identity provider integration settings
- Confirm group mapping configuration
- Review provisioning logs in your identity provider
Sync delays:
- Initial SCIM setup operations typically process within 3-5 minutes
- Synchronization SCIM operations rate depends on your identity provider. See How quickly changes are synchronized
- Large user batches may take longer
Getting Support
If you encounter issues with SCIM integration:
- Collect error provisioning logs and timestamps
- Note which operations are failing
- Contact support@cosafe.com with detailed information
For additional questions about SCIM integration, please contact our support team at support@cosafe.com.